
SKYLAR & PLUX
LEVEL DESIGN ASSIGNMENT
MY ROLES
Level Design
Set Dressing
Lighting
PROJECT TYPE
Level Design School Project
ASSIGNMENT SUMMARY:
Create a side-quest adventure level for the game Skylar & Plux, by RightNiceGames, using a branch of their original project repository and lead by Kevin Martinez, CEO of RightNiceGames.
GENRE
3D-Person Platformer
PLATFORM
PC
YEAR
2020
DEVELOPMENT TEAM
Me
GAME ENGINE
Unreal Engine
ASSIGNMENT TIME
2 Weeks


FIRST DRAFT & BLOCKOUT
First draft
The original layout of this level was first made as a challenge map for the first assignment of my level design course where the goal is to quickly ascend to the peak of a island mountain.
During the duration of the course it evolved into i little side story for Skylar where she is marooned on an island and need to find all the captured Loa's (the games friendly NPCs).

First sketch of the level layout. Triangles indicating the height level of the area.
First blockout
The first blockout was still made with the challenge map mindset and stays close to the first draft. It's based on keeping momentum using the game swing and giant fans to propel the player forward
2 maps from 1 core layout
It was around this time the idea to take inspiration from Mario games where you replay the same stage multiple times and it changes in small ways depending on what star you start the level with.
The basic layout of the level where to remain the same, while the two variations would add/remove/tweak sections to keep their respective flow.
The player are to play through the slower exploration based side quest level first, and when finished unlocks the challenge map where speed and momentum are the core pillars.

Top view from the first blockout with progression path
Design goals of the side quest level
-
Framing the Destination
-
Feeling of ascending high
-
Exploration focused
FRAMING THE GOAL
To help guide the player I start every section of the map by framing the players next point of interest. This gives the player a hint of in what direction to move but still lets the player explore the path on their own.
Level Intro
For the start I also see to it that the starting angle of the camera is set to show the mountain island in full and center the goal att at the mountain peak in the middle of the screen.
Stepping forward the player should look to their left for their first point of interest, a new gadget.
To nudge the player to look I've let the moon shine through from this direction, while also placing the NPC on the left side looking in the same direction. A few boxes to destroy for collectibles is also placed so the player likely will look leftward to attack.
If interacted with the NPC will mention the gadget they are looking at as something important.

Intro showing the mountain and leading the player to look to the left

Intro in blockout stage

Leading with environment
Using the gadgets high jump reaching the caged Loa, the player will again be facing towards the moon.
Here I use platforms, trees and fans in lines leading the players eyes in the right direction.
Final Version up top, first blockout of the same area on the right


Gems and torches
As many games before, I use the games collectibles (called gems) frequently to hint of the path forward.
Here I use it together with the fire at the cave entrance to light it up while keeping the surrounding dark to give the cave depth when looking into it.
Final Version up top, first blockout of the same area on the right

ASCENDING

A new gadget
Immediately in the cave the player will come across a (not so secret) secret cave with the magnet gadget.
Here the player will start feeling the verticality as they have to drop down and cross over a high drop to get back up.
From here on out there is a stronger emphasis on the feeling of verticality and height.
Up through the clouds
Out of the cave the emphasis on ascending is pushed again when the player have to move up through the clouds to move on.
As the path also is less straight forward and sidetracks, it gives the player a feeling of entering a more uncharted and dangerous area of the level

Final Version up top, first blockout of the same area on the left

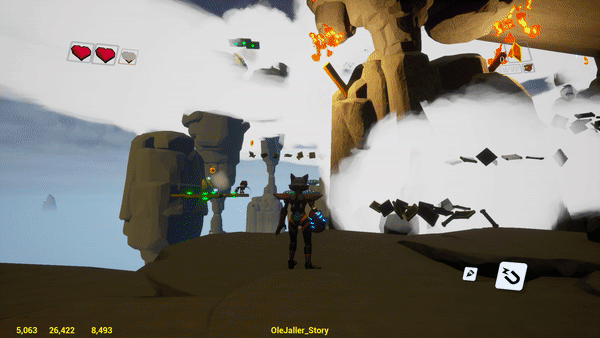
Guiding lights
As the clouds grow thicker and the torches light fades, the emissive light on the pillars marking the pathway up the mountain becomes the players guiding light.
The thick clouds enhances the feeling of height and danger as the visibility gets lowered.
Final Version up top, first blockout of the same area on the left

Through the blizzard
To again emphasize the feeling of ascending high, a small blizzard covers the area close to the mountain wall forcing the player to move up through it.
Coming out of the blizzard and cloud gives a feeling of release as a safe spot is reached with clear skies
above the clouds


No more fog or clouds covering the vision
The final ascent
From this point the player will see the last section of the level containing obstacles for the swings, fans and two gadgets used previously in the level.
This is a more platform heavy section that still pushes the feeling of ascending up. It's the biggest jump up in verticality and having multiple layers below when swinging over big gaps greatly enhances that feeling.

